Updated Installing Apache, Lizmap Web Client, and QGIS on Windows OS blog post. You need to have a GIS server set up first that uses the Lizmap Web Client. Then you use the Lizmap plugin in QGIS Desktop to help you publish the QGIS project as a web app to your GIS server. For this tutorial, I assume you already have QGIS Desktop installed. I have both QGIS Desktop LTR 2.18.21 and 3.2 installed on my computer but for this tutorial I am using the LTR 2.18.21 version – as that is the version of my QGIS Server and that my Lizmap Web Client is using. The Lizmap plugin will also work on QGIS desktop 3.2 but is listed as “experimental” so I take it that it hasn’t been fully tested yet(?). For this tutorial, I assume you already know the basics of using QGIS Desktop. The basic workflow is as follows:
- Set up working project directory
- Create and configure QGIS project for the web mapping
- Install and configure Lizmap plugin
- Publish QGIS project as web map to Lizmap Web Client
- View web map online via the Lizmap Web Client
- In the Command Prompt window: cd into your directory that contains the *.bat file
- Run the *.bat file
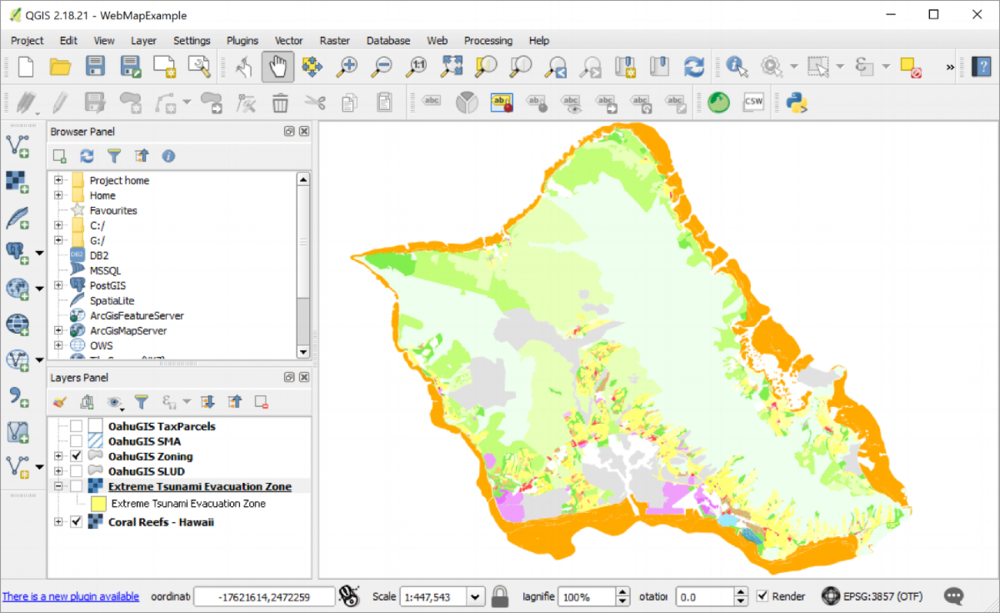 2. Configure QGIS project properties. Go to File menu >> Project Properties
See Lizmap configuration for more info: https://docs.3liz.com/en/publish/project_for_web.html
2. Configure QGIS project properties. Go to File menu >> Project Properties
See Lizmap configuration for more info: https://docs.3liz.com/en/publish/project_for_web.html
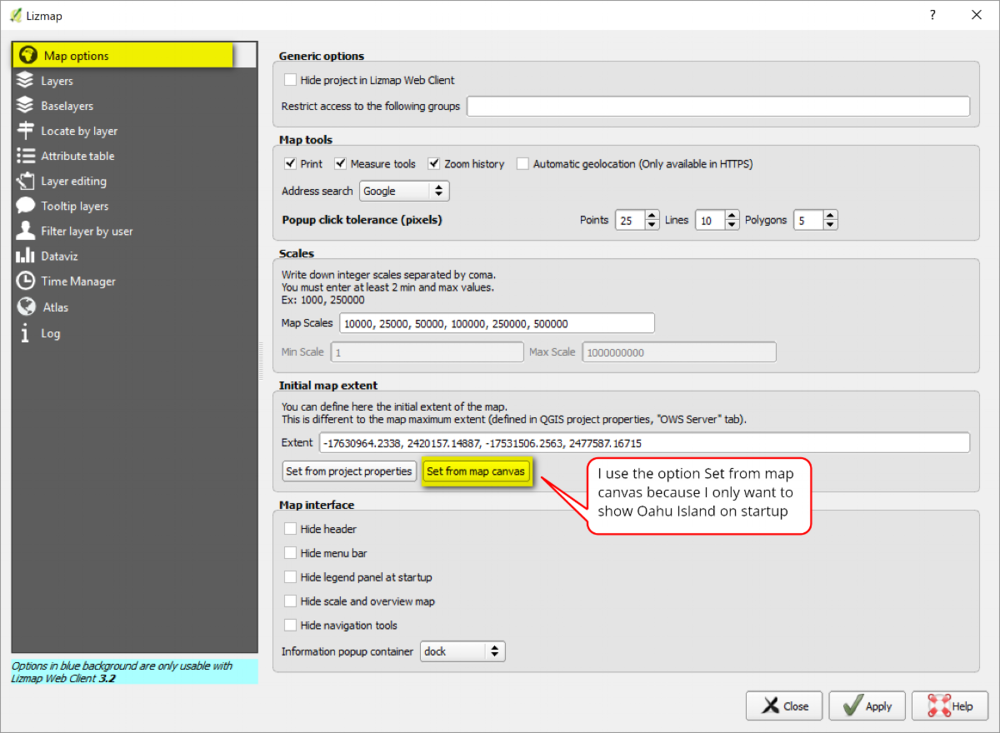
- General Tab: Use option Save Paths = relative ; fill or select other parameter option as you choose.
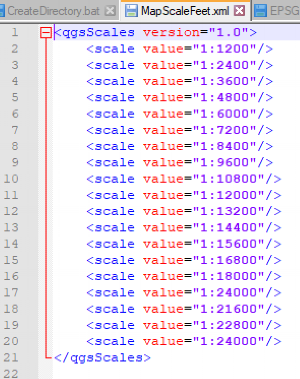
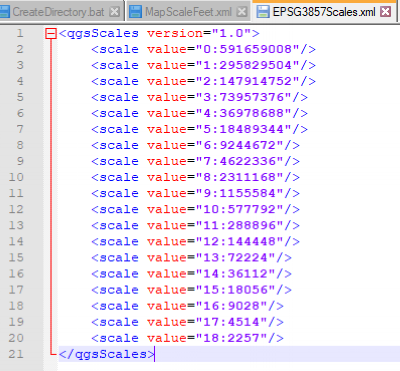
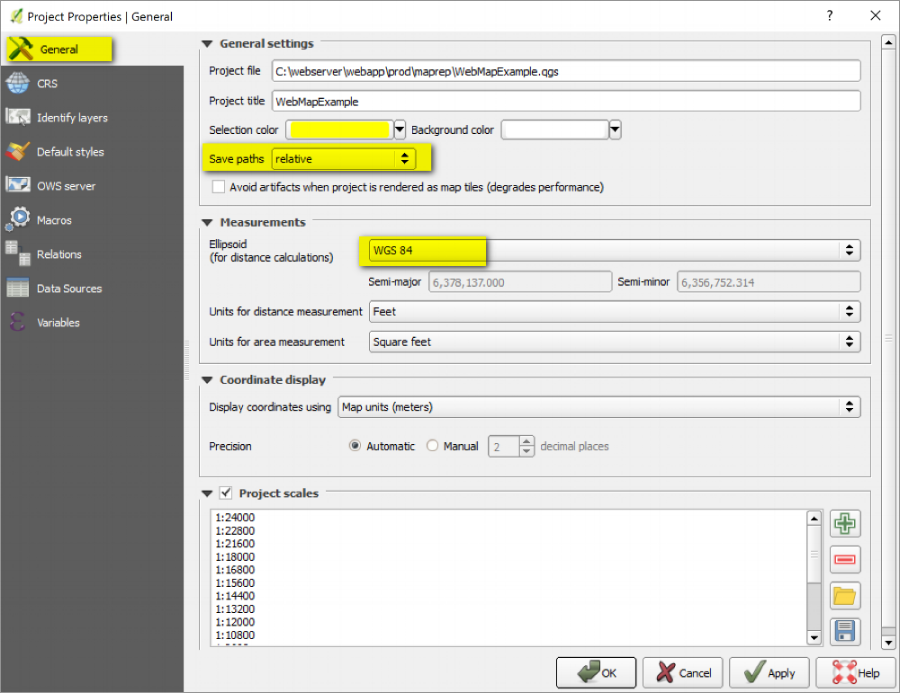 Note: For Project Scales you can enter manually or write them out into an *.xml file so it can be used for other projects. So example, here is my map scales in feet and as EPSG3857 (e.g. similar to Google Maps)
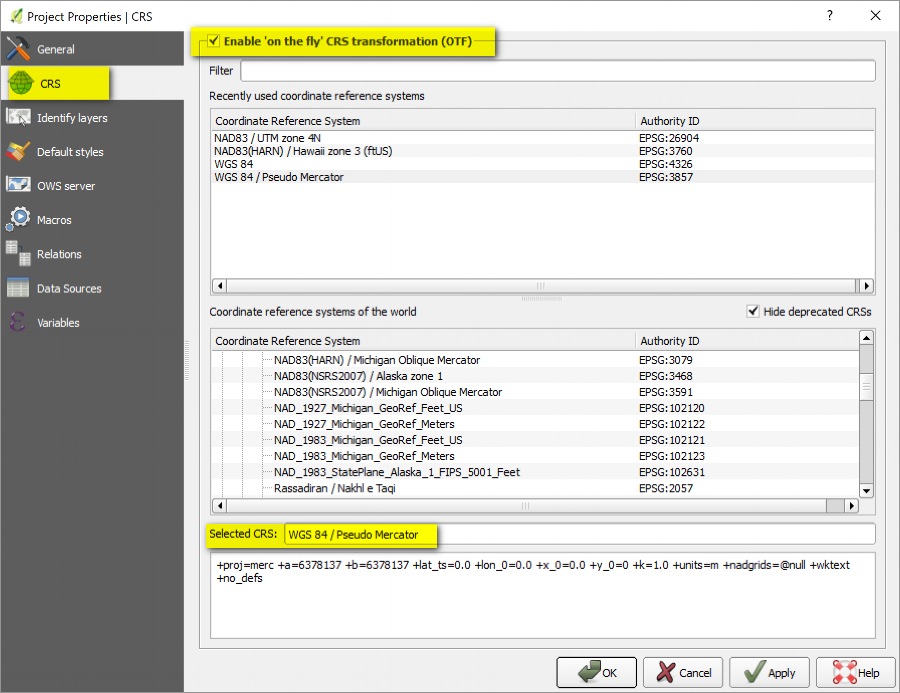
- CRS tab: check the option to for enable on the fly CRS transformation and use WGS84 Pseudo Mercator as the project CRS
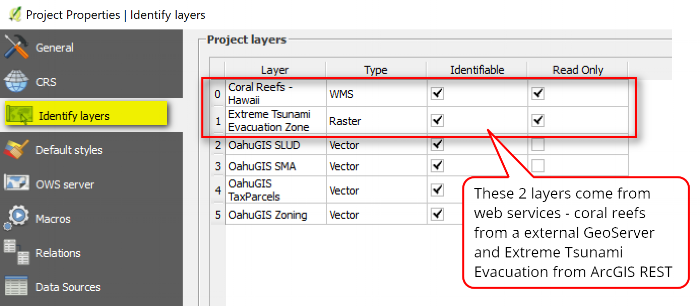
- Identify Layers tab: Select the layers that you want identifiable features
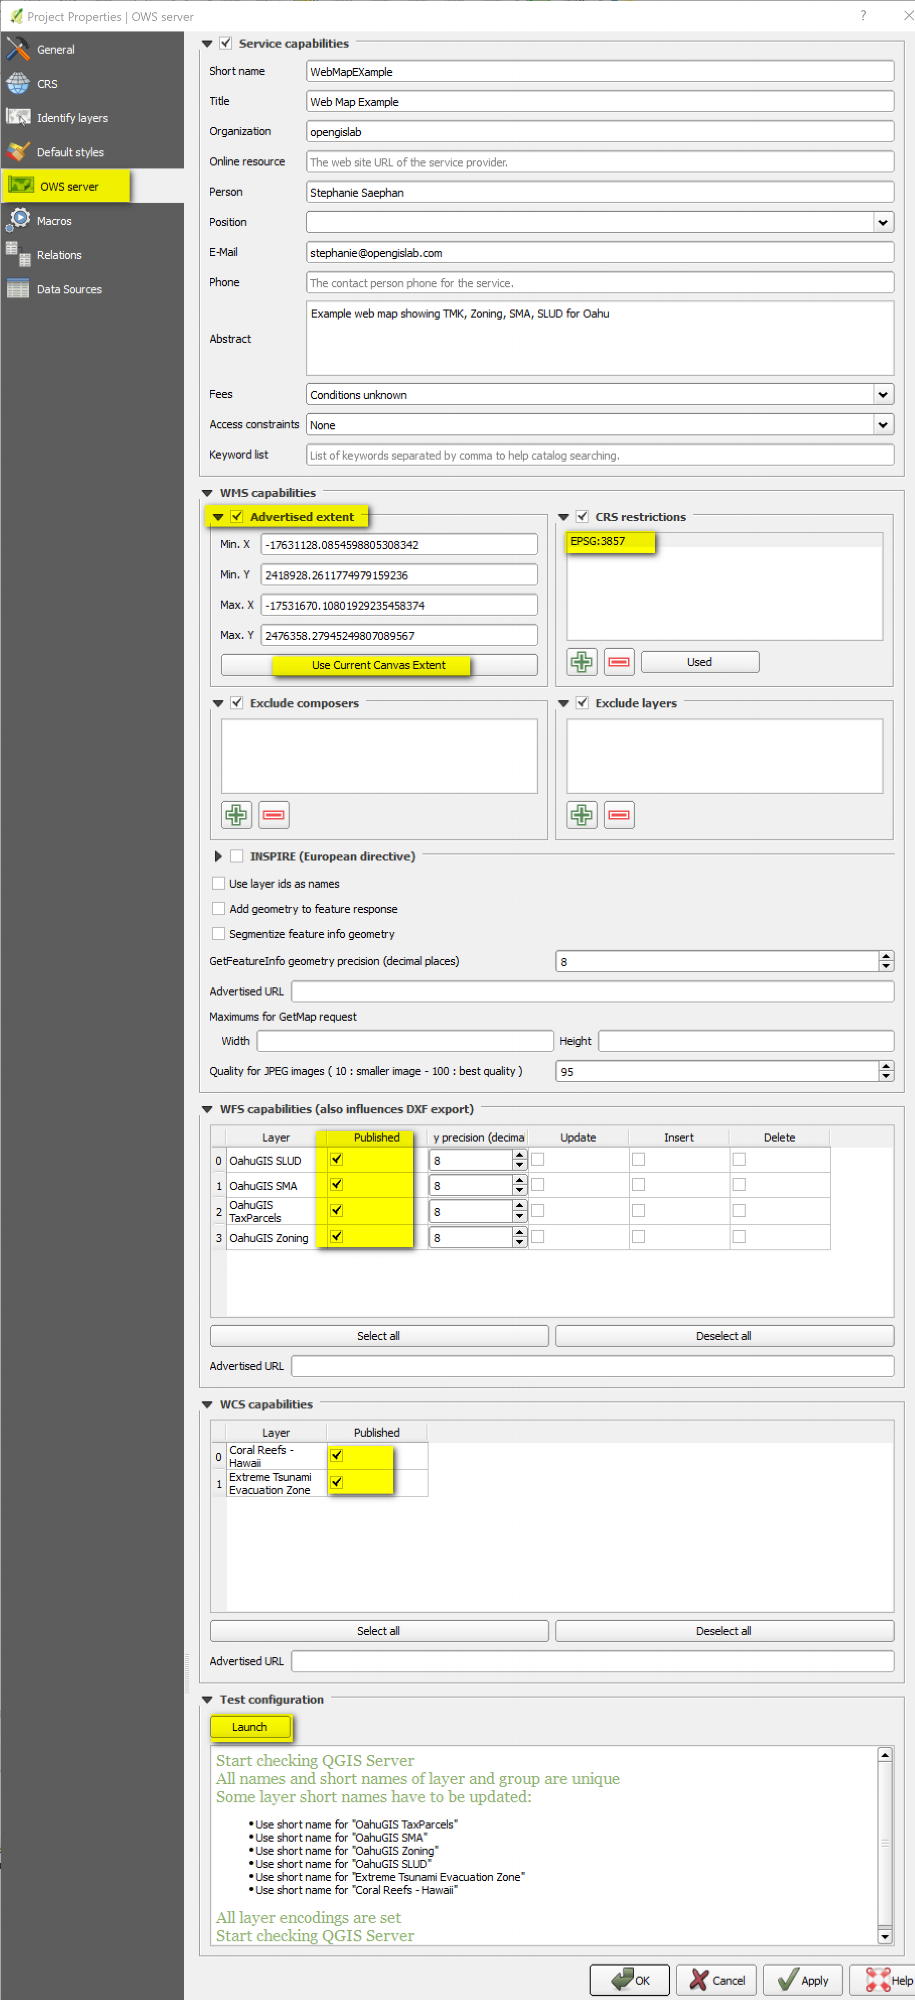
- OWS Server tab: Select Options
- Enable Service capabilities by checking the box
- Title - enter a title for your project (this will show up in Lizmap client)
- WMS Capabilities - check Advertised extent and Use Current Canvas Extent (this will use current map view); Add in CRS restriction if any
- WFS Capabilities - check layers you want published
- WCS Capabilities - check layers you want published (note: these are from external web services)
- Test Configuration - click Launch button and hopefully everything will be good
- Click OK and save your project
 Part 3: Install and configure Lizmap plugin
This part just shows you some of the basic configurations. See Lizmap configuration documentation for more info: https://docs.3liz.com/en/publish/lizmap_configuration.html
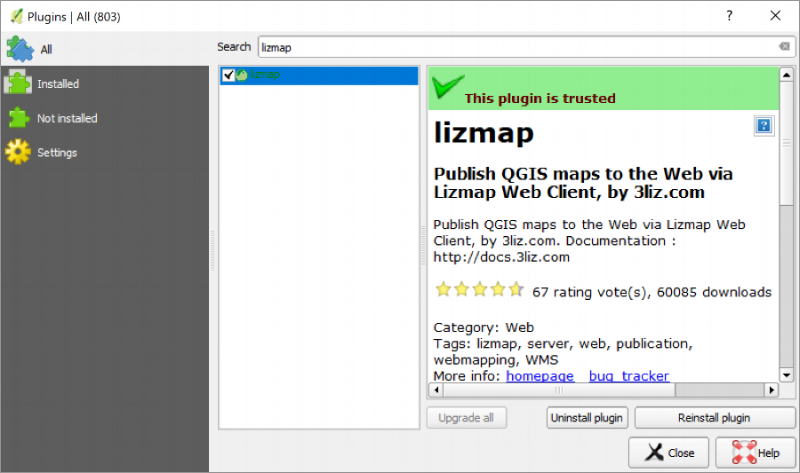
1. In QIGS, go to Plugins menu >> Manage and Install Plugins. In the Plugins window, search for Lizmap then install the plugin
Part 3: Install and configure Lizmap plugin
This part just shows you some of the basic configurations. See Lizmap configuration documentation for more info: https://docs.3liz.com/en/publish/lizmap_configuration.html
1. In QIGS, go to Plugins menu >> Manage and Install Plugins. In the Plugins window, search for Lizmap then install the plugin
 2. Configure Lizmap. Click on the Lizmap button (looks like a green globe) or go to Web menu >> Lizmap >> Lizmap
- In the Lizmap window: There are many options and parameters. You can choose whatever you like.
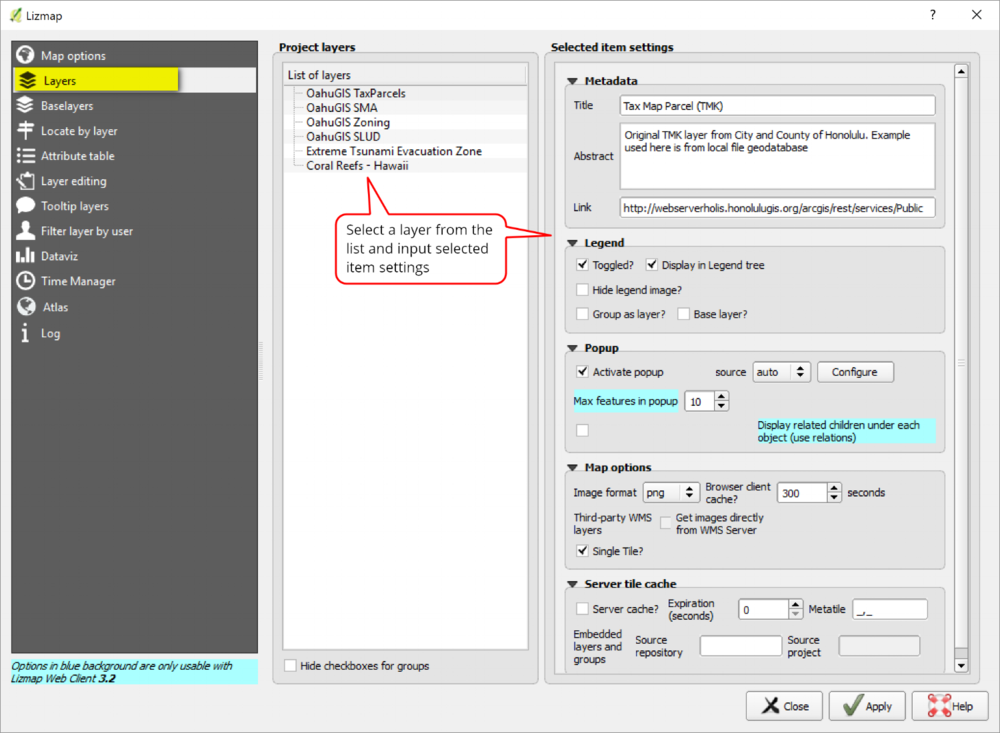
 Layers tab options: Input metadata and options for each layer in your project
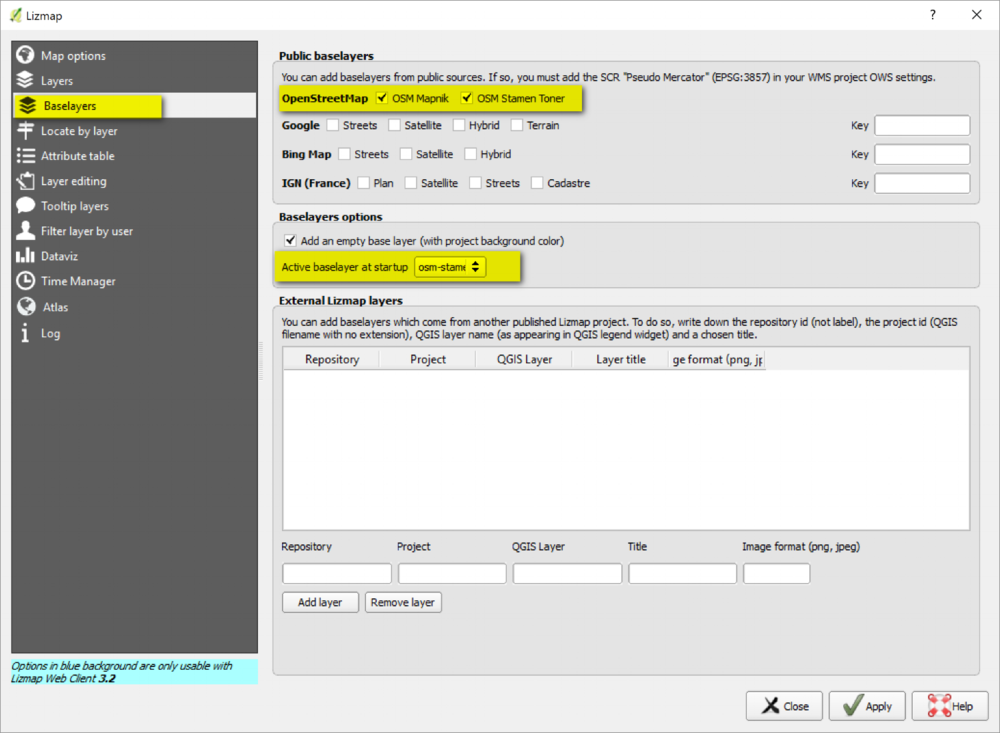
 Baselayers tab options: input basemap layer options.
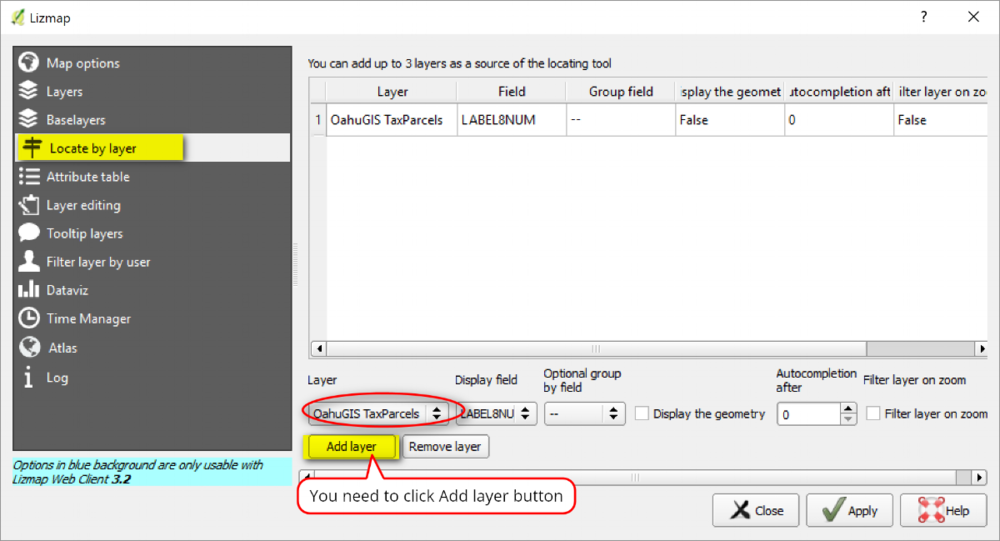
 Locate by layer tab options: Here I am adding the Tax Map Parcel (TMK) layer, so I can search by TMK number.
 Attribute table tab: Again here I am adding in the Tax Map Parcel layer so it's attribute table will be shown.
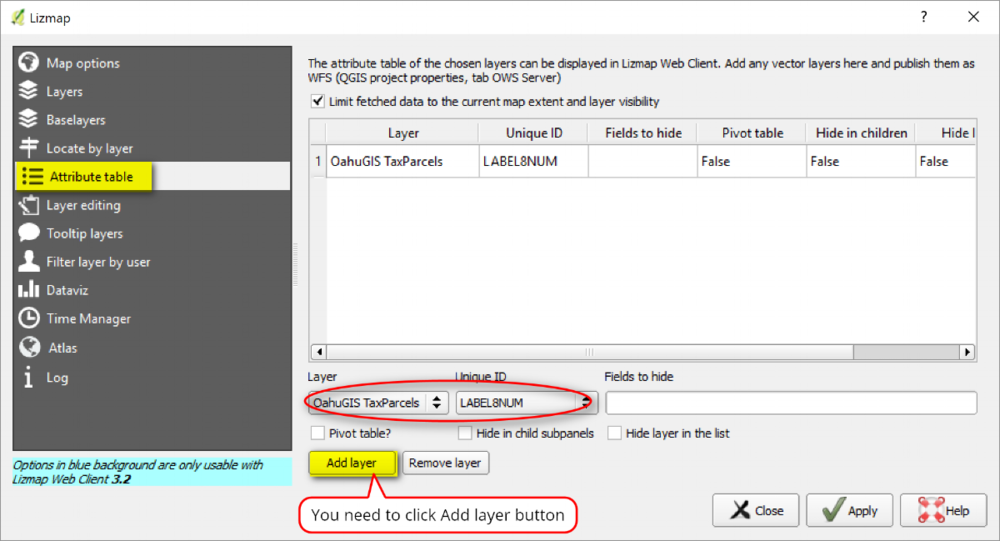 That's just some of the basic configuration set up I'm using for this example. After you are done with your set up, click Apply then Close. Also don't forget to save your QGIS project as well. After you apply and save the Lizmap configuration a configuration file (*.qgs.cfg) will be written with the same name of your project. Save your QGIS Project, and if you're happy with everything, then you can copy the project from your preproduction environmental to production for Lizmap web client to consume. For me that means copying everything from ../preprod/maprep to ../prod/maprep.
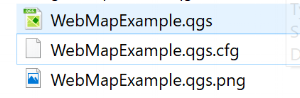
Thumbnail Image For Your Web App
If you want a custom thumbnail image to be displayed for your web app in the Lizmap web client view PROJECTS page, you can do so by taking an image and naming it with *.qgs.png file extension. Note in my example, I have a *.qgs.png image with same name as my QGIS project, which is really a snapshot of my QGIS map canvas. This image (*.qgs.png) will be used as the thumbnail image of my project web app. The default image for a web project in Lizmap is a black and white world map. You must include the .qgs file extension to your filename and saved in the same location as your *.qgs.cfg and *.qgs files - like this example.
That's just some of the basic configuration set up I'm using for this example. After you are done with your set up, click Apply then Close. Also don't forget to save your QGIS project as well. After you apply and save the Lizmap configuration a configuration file (*.qgs.cfg) will be written with the same name of your project. Save your QGIS Project, and if you're happy with everything, then you can copy the project from your preproduction environmental to production for Lizmap web client to consume. For me that means copying everything from ../preprod/maprep to ../prod/maprep.
Thumbnail Image For Your Web App
If you want a custom thumbnail image to be displayed for your web app in the Lizmap web client view PROJECTS page, you can do so by taking an image and naming it with *.qgs.png file extension. Note in my example, I have a *.qgs.png image with same name as my QGIS project, which is really a snapshot of my QGIS map canvas. This image (*.qgs.png) will be used as the thumbnail image of my project web app. The default image for a web project in Lizmap is a black and white world map. You must include the .qgs file extension to your filename and saved in the same location as your *.qgs.cfg and *.qgs files - like this example.
 Part 4: Publish QGIS project as web app to Lizmap web client
This step is basically just pushing your QGIS projects to Lizmap web client. See the Lizmap Administration guide for more info: https://docs.3liz.com/en/admin/index.html
1. Copy everything from ../preprod/maprep to ../prod/maprep
2. Log into Lizmap web client's Administration dashboard. Go to http://localhost/admin.php and login
3. In the Lizmap Configuration tab: Create a New Repository. You can also remove the default demo and intranet projects if you'd like.
See link for more info: https://docs.3liz.com/en/admin/lizmap-configuration.html#repositories
Part 4: Publish QGIS project as web app to Lizmap web client
This step is basically just pushing your QGIS projects to Lizmap web client. See the Lizmap Administration guide for more info: https://docs.3liz.com/en/admin/index.html
1. Copy everything from ../preprod/maprep to ../prod/maprep
2. Log into Lizmap web client's Administration dashboard. Go to http://localhost/admin.php and login
3. In the Lizmap Configuration tab: Create a New Repository. You can also remove the default demo and intranet projects if you'd like.
See link for more info: https://docs.3liz.com/en/admin/lizmap-configuration.html#repositories
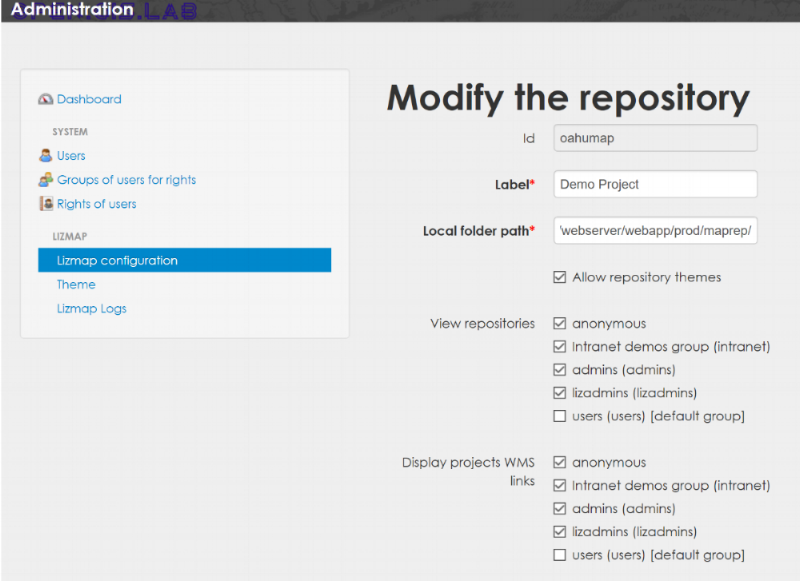
- ID: Id of your repository (e.g. oahumap). it seems like you can only use lowercase with no spaces or special characters
- Label: Name of your repository (e.g. Demo Project)
- Local Folder Path: path to your QGIS project (e.g. /webserver/webapp/prod/maprep/). Do not include Drive letter or use back slashes in your path.
- Check the box to allow use of repository themes
- Click Save - you will see then automatically be able to view the user group rights and check what each types of user group can do
- Save your modifications
 3. Optional - Theme settings: Go into the Theme settings and Modify options if you want for your web app.
If you wan to do more advanced theme creations, see advance lizmap configuration link: https://docs.3liz.com/en/publish/advanced_lizmap_config.html#creating-simple-themes
3. Optional - Theme settings: Go into the Theme settings and Modify options if you want for your web app.
If you wan to do more advanced theme creations, see advance lizmap configuration link: https://docs.3liz.com/en/publish/advanced_lizmap_config.html#creating-simple-themes
 4. Go to the PROJECTS page (button in top right) and you should see your projects. Note you can have more than 1 projects in your repository - I have 2 projects in mine.
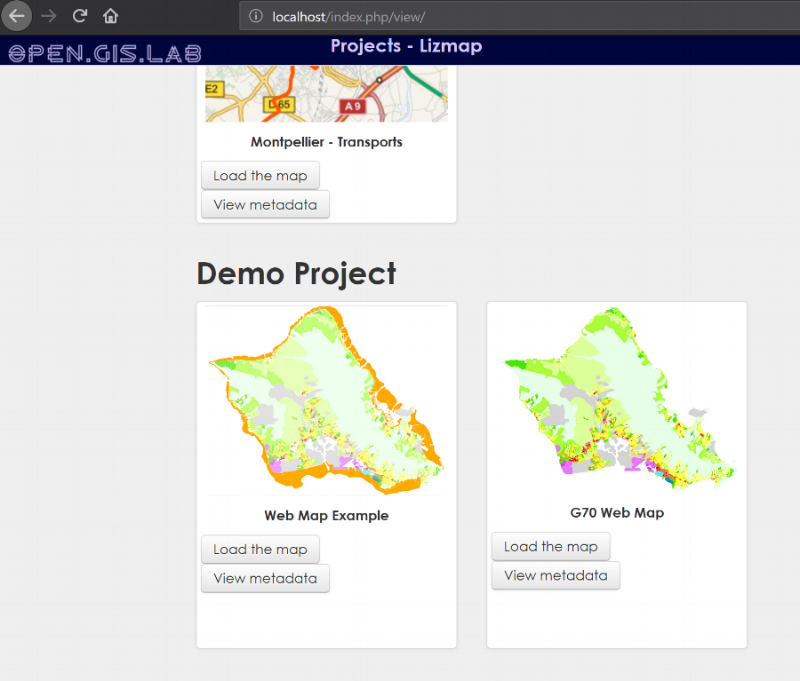 Here's what my web map example looks like.
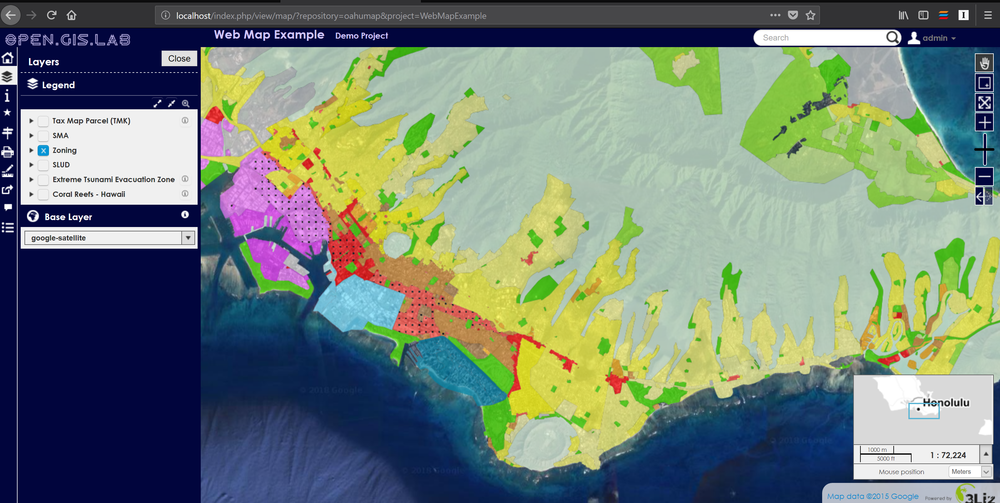 That's basically it for a basic configuration and publishing of QGIS project to Lizmap web client. You'll notice in my web app that I have added a google-satellite basemap and an overview map - these are advance configurations which are explained below.
Step 5: Some Advance Configurations and Caveats
For more info on advance configuration of Lizmap plugin and web client see: https://docs.3liz.com/en/publish/advanced_lizmap_config.html
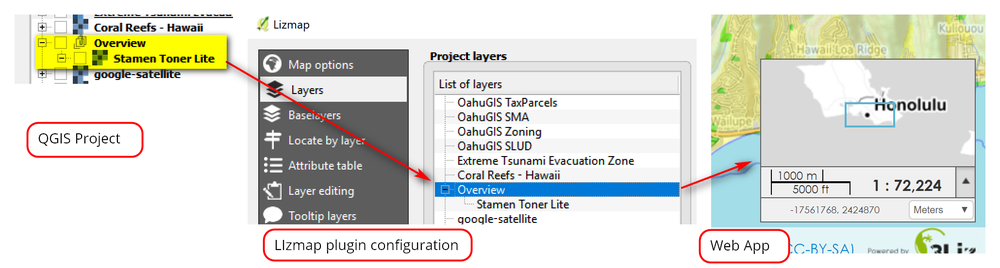
Adding An Overview Map
To add an overview map to your web app, you just add a group layer in QGIS with the named "Overview" (without quotes) - this will indicate to Lizmap web client to use it as the overview map. Then add your data layers to the group - in my example, I'm only using a stamen-toner web service in my overview map.
That's basically it for a basic configuration and publishing of QGIS project to Lizmap web client. You'll notice in my web app that I have added a google-satellite basemap and an overview map - these are advance configurations which are explained below.
Step 5: Some Advance Configurations and Caveats
For more info on advance configuration of Lizmap plugin and web client see: https://docs.3liz.com/en/publish/advanced_lizmap_config.html
Adding An Overview Map
To add an overview map to your web app, you just add a group layer in QGIS with the named "Overview" (without quotes) - this will indicate to Lizmap web client to use it as the overview map. Then add your data layers to the group - in my example, I'm only using a stamen-toner web service in my overview map.
- In QGIS, create a group layer and name it Overview
- Add your data layers to your Overview Group
 Adding Basemaps For Viewing And Printing
Note: If you need help adding basemaps, see my posting on Adding Basemaps in QGIS
There are basically 2 ways you can add basemaps to your web app: 1) via Baselayers tab and 2) as a group or layer(s) in QGIS project
The first way is quick and easy way - you just check the basemap options (e.g. Google, OpenStreetmap, Bing, IGN (France) in Baselayers tab in the Lizmap plugin configuration window. However, adding basemaps via the Baselayers tab will not print as these basemaps are external to your QGIS project - see https://docs.3liz.com/en/publish/advanced_lizmap_config.html#allow-printing-of-external-baselayers.
To work around this, you need to add the basemap(s) as a group or layer in QGIS whose name is part of the following list - these corresponds with the external basemaps in the Baselayers tab of Lizmap plugin.
NOTE: Remember you still have to be in compliance with the licensing terms of all the basemaps you use.
Adding Basemaps For Viewing And Printing
Note: If you need help adding basemaps, see my posting on Adding Basemaps in QGIS
There are basically 2 ways you can add basemaps to your web app: 1) via Baselayers tab and 2) as a group or layer(s) in QGIS project
The first way is quick and easy way - you just check the basemap options (e.g. Google, OpenStreetmap, Bing, IGN (France) in Baselayers tab in the Lizmap plugin configuration window. However, adding basemaps via the Baselayers tab will not print as these basemaps are external to your QGIS project - see https://docs.3liz.com/en/publish/advanced_lizmap_config.html#allow-printing-of-external-baselayers.
To work around this, you need to add the basemap(s) as a group or layer in QGIS whose name is part of the following list - these corresponds with the external basemaps in the Baselayers tab of Lizmap plugin.
NOTE: Remember you still have to be in compliance with the licensing terms of all the basemaps you use.
- osm-mapnik for OpenStreetMap
- osm-mapquest for MapQuest OSM
- osm-cyclemap for OSM CycleMap
- google-satellite for Google Satellite
- google-hybrid for Google Hybrid
- google-terrain for Google Terrain
- google-street for Google Streets
- bing-road for Bing Road
- bing-aerial for Bing Aerial
- bing-hybrid for Bing Hybrid
- ign-scan for IGN Scan
- ign-plan for IGN Plan
- ign-photo for IGN Photos
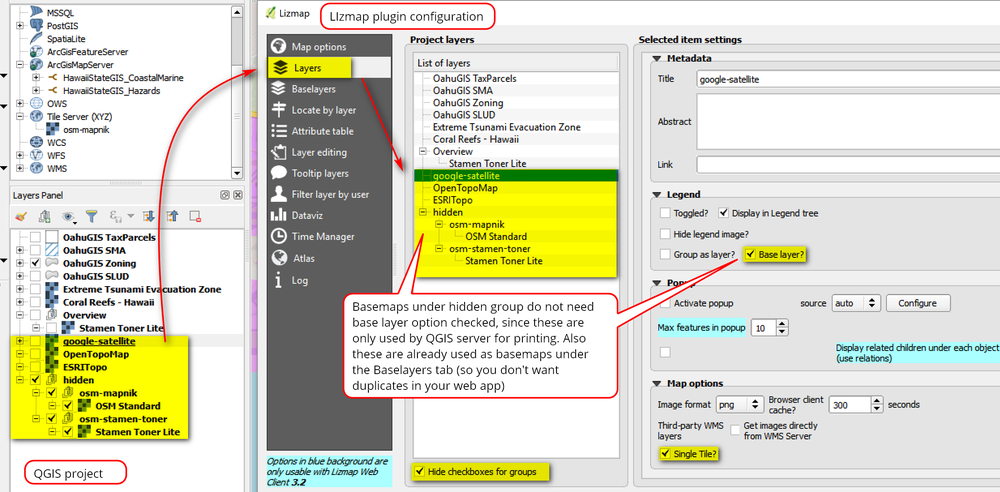
- In QGIS, I used the QuickMapServices plugin to add in these basemaps: Google Satellite, Open Topo Map, and ESRI Topo.
- Rename Google Satellite to "google-satellite" (without quotes and to match the naming convention from list above). I left OpenTopoMap and ESRITopo as is since they're not in the list above)
- Create a Group and call it "hidden". Then create sub-group named "osm-mapnik" which contains the OSM Standard basemap, and sub-group named "osm-stamen-toner" which contains the Stamen Toner Lite basemap
- In Lizmap plugin configuration, Layers tab:
- For google-satellite, OpenTopoMap, and ESRITopo, check base layer? option (these are not part of the default Lizmap baselayers and I want to use them as Basemaps). Also check option for use Single Tile?
- For hidden groupings: No need to check option to use as base layers since these are hidden anyway and will only be used for printing purpose. Also these are already part of the default lizmap baselayers options and you don't want duplicate basemaps in your web app.
- Check box to Hide checkboxes for Groups
- Save your Lizmap configuration and QGIS Project
 Printing Basemaps In Your Web App In Lizmap Web Client Viewer
Printing basempas in your web app via the Lizmap web client viewer is a bit tricky. First you need to have a print composition in your QGIS project and it needs to have at least 1 map in it and you also need to enable the printing function in Map options tab of the Lizmap plugin configuration window.
Caveat
Printing basemaps in Lizmap may not always work. One big caveat is, you cannot have text labels in your print composition - otherwise you will get an "Internal Server Error" and your map will not print. It seems to me that the printing of basemaps can sometimes be finicky. I've gotten errors even after I've removed text labels in my print compositions - something about the basemap layer not being found or define (e.g. Layer "osm-mapnik" not found). What I did for this error was to clear my cache and log off and log back into my Lizmap Administration page - this worked for me.
I'm not sure if printing basemap issues are from Lizmap's end or QGIS Server. I've seen on some forums, suggestions for installing a fake X server but that's for Linux and/or Mac OS - I don't think that's an option for Windows OS. This makes me think it's a QGIS Server issue, but I don't know. By the way, printing of basemaps in the QGIS project works fine - it's just the printing in the web app that can be a problem.
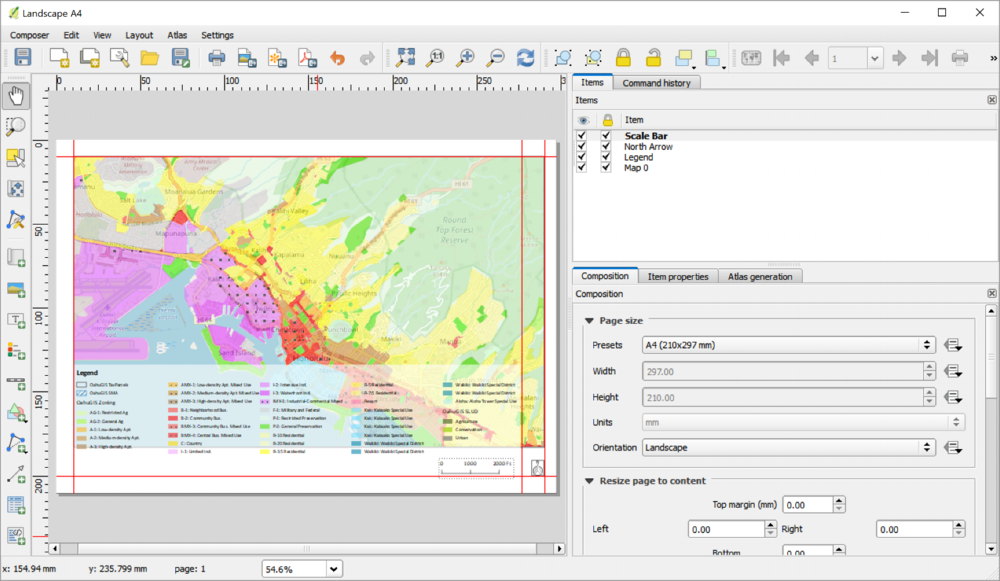
Here's an example of my print composition. It is a simple A4 landscape layout. Create your print compositions and save your project, then in the web app you can select the layout to use as template for printing.
Printing Basemaps In Your Web App In Lizmap Web Client Viewer
Printing basempas in your web app via the Lizmap web client viewer is a bit tricky. First you need to have a print composition in your QGIS project and it needs to have at least 1 map in it and you also need to enable the printing function in Map options tab of the Lizmap plugin configuration window.
Caveat
Printing basemaps in Lizmap may not always work. One big caveat is, you cannot have text labels in your print composition - otherwise you will get an "Internal Server Error" and your map will not print. It seems to me that the printing of basemaps can sometimes be finicky. I've gotten errors even after I've removed text labels in my print compositions - something about the basemap layer not being found or define (e.g. Layer "osm-mapnik" not found). What I did for this error was to clear my cache and log off and log back into my Lizmap Administration page - this worked for me.
I'm not sure if printing basemap issues are from Lizmap's end or QGIS Server. I've seen on some forums, suggestions for installing a fake X server but that's for Linux and/or Mac OS - I don't think that's an option for Windows OS. This makes me think it's a QGIS Server issue, but I don't know. By the way, printing of basemaps in the QGIS project works fine - it's just the printing in the web app that can be a problem.
Here's an example of my print composition. It is a simple A4 landscape layout. Create your print compositions and save your project, then in the web app you can select the layout to use as template for printing.
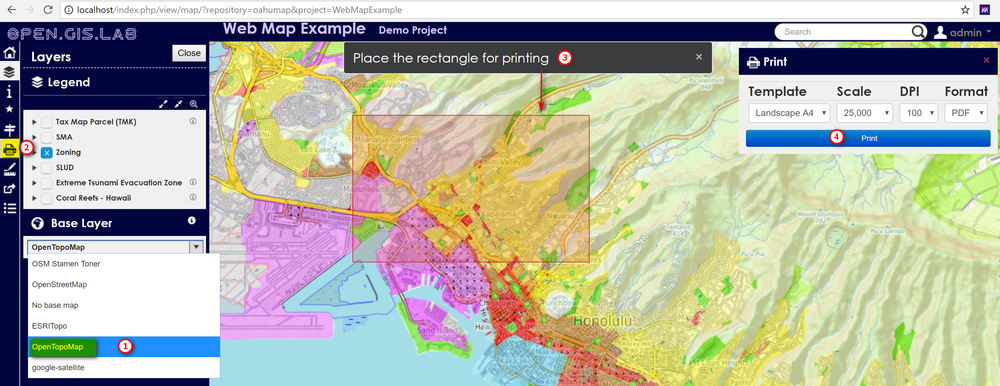
 Here's an example of the printing function in my web app. Using the print function is pretty self explanatory.
 Here are some snapshots of print pdf maps with each of the different basemaps selected for printing in my web app.
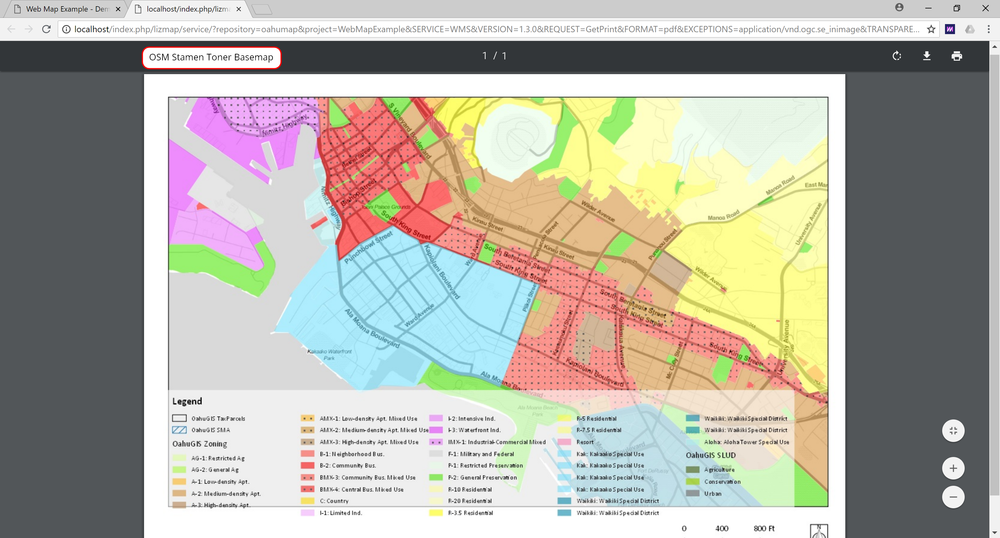 PDF with OSM Stamen Toner basemap (it's actually stamen toner lite)
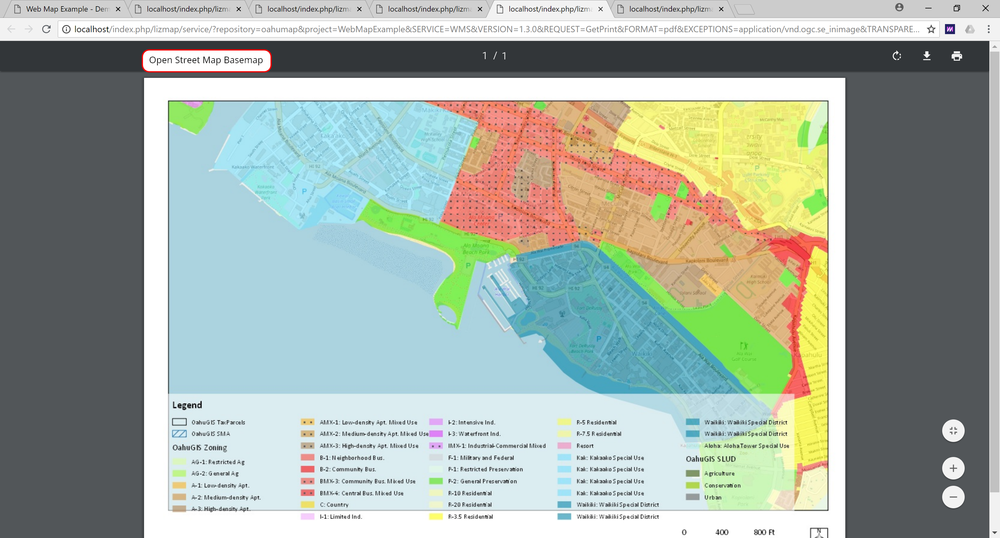 PDF with Open Streetmap basemap
 PDF with Google Satellite basemap
 PDF with ESRI Topo basemap
 PDF with Open Topo Map basemap
Ok, so that's it for this tutorial. Thanks for reading!]]>
PDF with Open Topo Map basemap
Ok, so that's it for this tutorial. Thanks for reading!]]>
Hi, I am at the same stage as you with the running of Lizmap and QGIS etc. I notice that you have not used the ‘Edition’ tool that allows users to edit or add to layers. Is this because like me you cannot get it to work? If you have any idea of how to get it to work I would be very interested 🙂